
first
Separate your charms into color families, such as pinks, greens, and browns. Or you can choose to separate into lights and darks. Mine are by color.

 If any of your charms are very close to the same color you are using as a solid, you'll want to remove those from use in this project. Otherwise, you'll get too much of a blend between them. For instance, I eliminated several of the white background charms because I am using Kona Snow as my solid.
second
Pair charms in sets of 2 and place rights sides together. Try to not put two from the same separated color or light/dark piled together. Instead, pick from different piles to create variety.

third
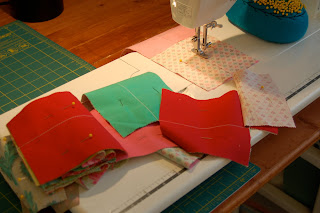
One pair at a time, place your charm "couples" and make sure one is lined up perfectly on top of the other. Place on a rotary cutting mat, squaring the top and left sides to inch marks. Place a ruler at the 2.5" mark from the top to the bottom of the charm and draw a line. You now have a line going down the center of your charm.
Next, draw a line 1/4" from the center line to BOTH the right and the left of the center line. Now you have THREE lines going down your charm. Carefully pin your charm if you prefer to pin your pieces to the right and left of the lines. Do this for all charm "couples."


fourth
Stitch a straight line along each of the lines to the left and right of the center line. To cut time, chain stitch your charms. Chain stitch by stitching to the right of each charm couple center line without cutting the thread in between. Then, flip the all charm couples chained together around to stitch to the left of the center line. When finished stitching all together, snip the connecting threads between each charm couple.
Stitch a straight line along each of the lines to the left and right of the center line. To cut time, chain stitch your charms. Chain stitch by stitching to the right of each charm couple center line without cutting the thread in between. Then, flip the all charm couples chained together around to stitch to the left of the center line. When finished stitching all together, snip the connecting threads between each charm couple.


fifth
Line ruler on the center line of each charm couple and rotary cut. Press open pieced charms.


sixth
Separate the pieced charms into sets of 8. Try to not repeat a combination within the same set. Arrange the pieced charms into stacked rows of 4, side-by-side. Try to not have the same fabric next to each other.

seventh
Sew the pieced charm rows of 4 together. Press open.

eighth
Square up each strip of pieced charm rows.

Wonderful, very clear directions and pictures. Thanks.
ReplyDelete